Installation
Install shard using Visual Studio Code or GitHub Desktop.
With Visual Studio Code, you have two ways of installing Shard. With our visual studio code extension, or by cloning the repository with Git and/or GitHub Desktop.
We recommend using the Visual Studio Code extension for a smoother experience, especially if you're new to Shard.
Installing Shard with Visual Studio Code Extension
1. Install the Extension
The easiest way to install Shard is by using the Shard Visual Studio Code extension. This extension provides a simple interface for managing Shard. It also provides a way to easily install Shard packages.
- Open Visual Studio Code.
- Go to the Extensions view by clicking on the Extensions icon in the Activity Bar on the side of the window. You can also open it by pressing
Ctrl + Shift + X(Windows/Linux) orCmd + Shift + X(Mac). - Search for "Shard" in the Extensions Marketplace.
- Download
shard-frameworkbyWil Wilson
Optionally you can download the extension from the Visual Studio marketplace Shard Extension.

2. Initialize Shard with the Extension
Once you have the extension installed, you can initialize Shard in your project.
- Open or create a folder in Visual Studio Code where you want to create your Shard project.
- Open the Command Palette by pressing
Ctrl + Shift + P(Windows/Linux) orCmd + Shift + P(Mac). - Type
Shard: New Projectand select it.

3. Use Rojo to Visual Studio Code to Roblox Studio
If you're new to Visual Studio Code with LuaU, we recommend using Rojo to connect your code to Roblox Studio. Rojo is a tool that allows you to sync your local files with Roblox Studio.
We recommend pairing Rojo with extensions such as StyLua for formatting your code, and Luau Language Server for code completion and linting.
Installing Shard by Cloning the Repository
You can also install Shard by cloning the repository from GitHub. This method is ideal if you want full control over the source or plan to contribute to development.
Option 1: Using GitHub Desktop
Method A: Open Directly from GitHub
- Make sure GitHub Desktop is installed.
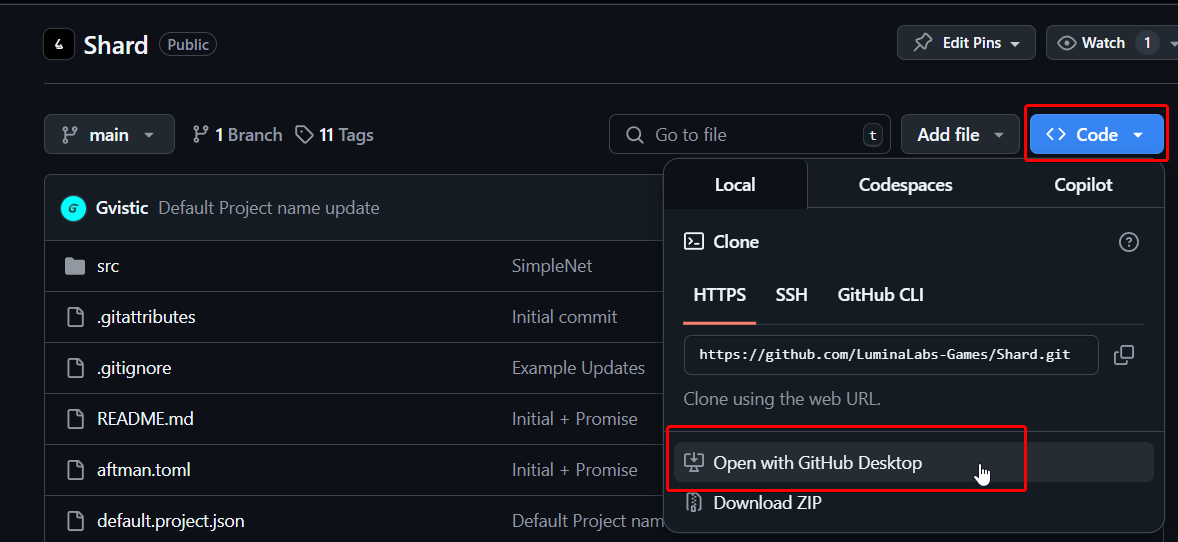
- Go to the Shard GitHub page.
- Click the Code button and choose Open with GitHub Desktop.
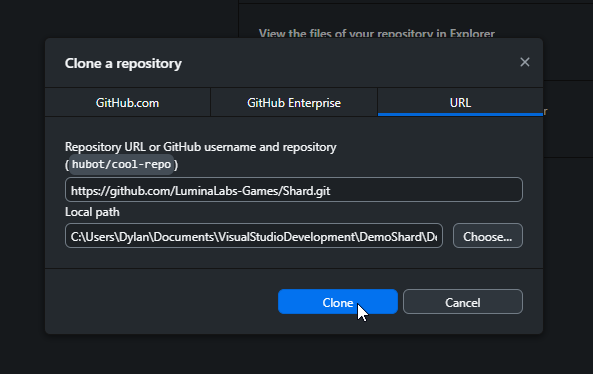
- In GitHub Desktop, set the local path where you want to clone the repository and click Clone.
-
To open the project in Visual Studio Code:
- Go to the top menu and click
Repository>Open in Visual Studio Code, - Or use the shortcut
Ctrl + Shift + A(Windows/Linux) orCmd + Shift + A(Mac).
- Go to the top menu and click
Method B: Manually Clone via GitHub Desktop
- Launch GitHub Desktop.
- Go to
File>Clone Repository. - Make sure the current tab is the URL tab, where you can input the repository URL.
- Copy & Paste the repository URL in the URL field:
https://github.com/LuminaLabs-Games/Shard.git - Select a local path where you want to clone the repository and click Clone.
- Open it in VS Code via the
Repositorymenu or shortcut as above.
Option 2: Using Bash
- Open a terminal.
- Navigate to the directory where you'd like to clone the project.
- Run:
git clone https://github.com/LuminaLabs-Games/Shard.git
cd Shard
code .
Awesome now that you have Shard installed, lets overlook the overall structure of Shard and some of its key components.